How to Make Your Own Email Address in Gmail, Explained 2026

Impressions count in business. Even a detail as small as your email address influences how people view your brand.
As a small business or a start-up, perhaps you’ve tried using a personal email account for business. It’s easy, right? Gmail is the biggest free email service in the world. Most people already have a Gmail address.
But you have to be careful. If people get an email from an organization, they expect to see the business name in the sender’s email address and in your marketing materials. Sending business emails from an @gmail.com account doesn’t look very professional. Even more important, people will question whether your message is legit. Not having your own professional email address will mean more of your emails get flagged as spam.
The answer? Create a custom domain email address. That is, an email address with your business name after the @ sign. You can do this in Google Mail. And I’m going to show you how.
How to Make Your Own Email Addresses in Gmail
So how do you make your own custom email addresses in Gmail? Or, how do you replace @gmail.com with @yourbusiness.com?
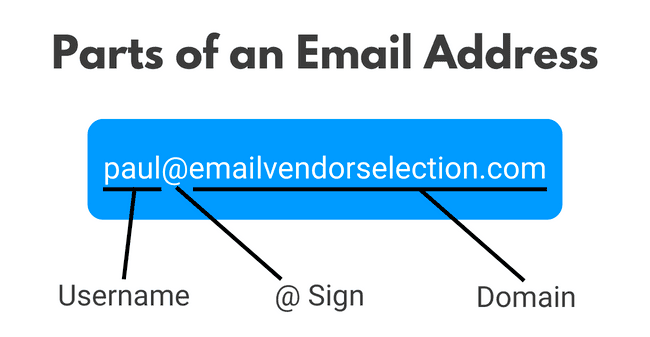
A custom email address features your own domain name. An email domain is the part after the @ sign. So, in standard, free, personal Gmail accounts, the domain is always @gmail.com. To change it, you need a custom domain name.
Think of a domain as a ‘space’ you buy on the internet. Or, more accurately, the address of that space so people can find it. We’re all familiar with this idea through websites. A website domain is the address you type into a browser to find that site.
There are 2 main options for replacing a standard Gmail address with a custom domain:
- Set up and buy a domain when you create a Google Workspace account.
- Create a domain elsewhere with a domain registrar and then connect it to a Google Workspace account.
The second option will apply to you if you already have a business website. You will already have a custom domain for your site. But not all web hosting plans include email. If you don’t have business email set up already, check your web hosting account. Bluehost is a good example of a service that offers both web and email hosting with a single domain. For no extra cost.
In this article, I will cover:
- How to set up a custom Gmail address and domain in Google Workspace.
- How to set up a custom Gmail address in Google Workspace using an existing domain.
- How to use an existing custom email address to create a custom Gmail address.
- How to set up a custom email address with your web hosting service.
Is Gmail the right email service for your business? For bulk email sending, read this article on how to send emails with the Gmail SMTP server. And if you want to use Gmail with HTML templates, read our guide on how to send HTML email in Gmail and our review of free email template builders for Gmail.
How To Create a Custom Email Address and Domain Name in Google
You don’t have a website or a domain name yet? No problem. You can do everything you need to set up a custom email address from scratch in Google Workspace. This is a great option for new businesses. Especially if the first thing you want is a business email address.
Google Workspace (formerly G-Suite) is a complete productivity and collaboration platform for businesses. It includes a long list of well-known apps. Google Drive for cloud storage. Google Docs, Sheets, and Slides. Gemini, Google Meet, and Chat. And, of course, Gmail.
All Workspace business accounts include a custom email domain. Starting at $7 per user, per month, that’s good value. There’s also a 14-day free trial.
Create your own email with Google Workspace
1. Create a Google Workspace account and get your domain
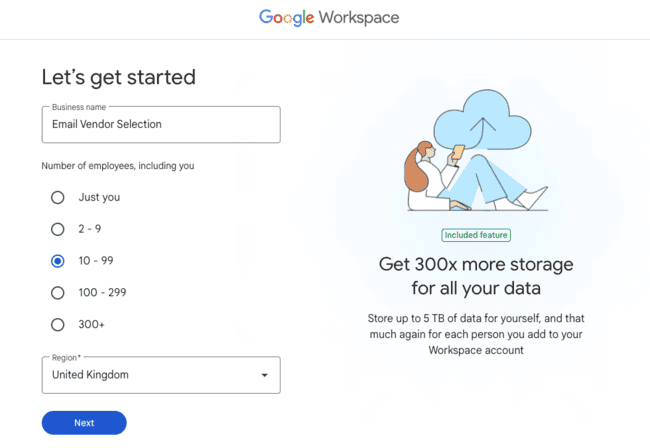
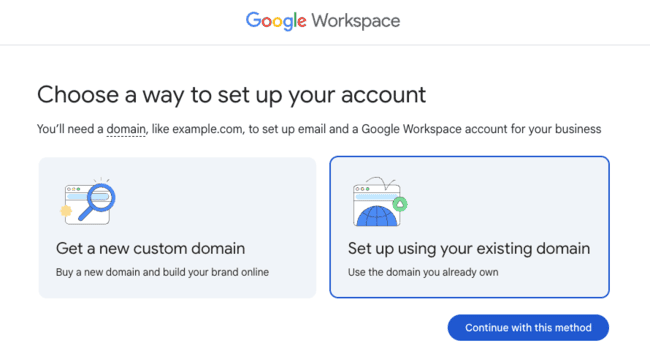
It couldn’t be easier to get started on Google Workspace. You input your business name and some other details about your business. Then you get asked if you have an existing domain or not:
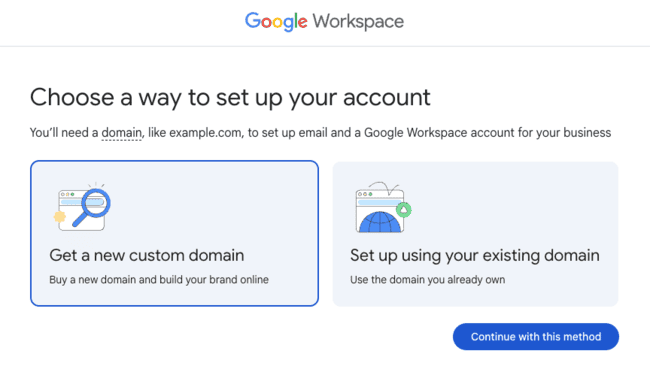
Click “Get a new custom domain”. The next step is find a domain name. Ideally, you want your business name to be your domain. That’s just what people expect when they get an email from a business. Google searches for available domain names for you. Then lists them along with their cost per year.
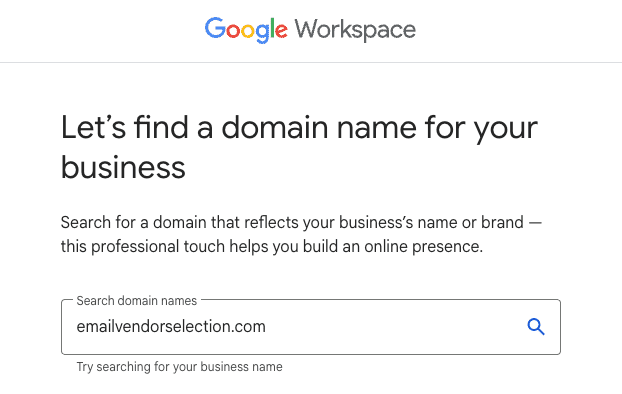
You may find alternatives to your business name. This is because the domains for that term are already taken.
Try choosing a different top-level domain. The top-level domain is the part after the dot. So .com or .co.uk or .net etc. You’ll find .com domain names are the most popular. If that option isn’t available, choose another.
In some cases, you may find a lot of the most popular top-level domains you’d like to use are taken. This can happen if you have a very generic business name. It’s a good reason to choose a more unique name for your business.
You have a couple of options here. You could choose a less common top-level domain. They’re a little more expensive. And bear in mind that you want a domain that still looks professional. You could also consider tweaking the domain slightly. For example, you could add numbers. Or abbreviate your business name. Just make sure it’s recognisable as your brand.
Once you choose your domain, Google will use it to set up your Workspace account. This means your Gmail account will also be set up with that domain. So instead of emails being sent out with the gmail.com domain, people will see your business name.
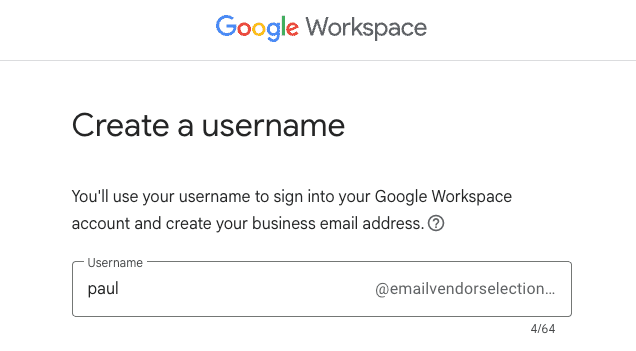
2. Add a username to your account
The next thing you need to do is set up usernames and inboxes. These could be user accounts with different people’s names. Or generic inboxes like sales@ or office@.
If you’re just setting up email for yourself, keeping it simple usually works best. Using your name, like “paul@emailvendorselection.com,” feels personal and professional.
If you’re creating email addresses for a team, there’s a bit more to consider. Think about:
- how big your organization is,
- what you’ll use the emails for,
- and how you want your brand to appear in inboxes.
First-name-only email addresses can get messy fast if you ever hire two people with the same name. And email addresses that are long or complicated can be hard for customers to remember and easy to mistype.
Beyond using just a first name, two widely used usernames are first initial plus last name or a full name format. Both look professional, scale well as your team grows, and make it easy for people to know who they’re emailing. Here are some examples:
| Professional email address format | Example |
| First name | paul@emailvendorselection.com |
| Last name | newham@emailvendorselection.com |
| First and last name | paulnewham@emailvendorselection.com paul.newham@emailvendorselection.com |
| First name and last initial | pauln@emailvendorselection.com paul.n@emailvendorselection.com |
| First initial and last name | pnewham@emailvendorselection.com p.newham@emailvendorselection.com |
| Role-based inboxes | marketing@emailvendorselection.com sales@emailvendorselection.com support@emailvendorselection.com info@emailvendorselection.com |
Complete the purchase, and you’re ready to start sending professional emails with your own domain.
Create your own email with Google Workspace
Google Workspace Discounts
You can get 20% off the Standard and Plus plans using these coupon codes.
- Ends January 31, 2027
Apply the unique promotion code when prompted. This code is only valid for new Google Workspace users and the Standard plan. See additional terms and conditions
- Ends January 31, 2027
Apply the unique promotion code when prompted. This code is only valid for new Google Workspace users and the Plus plan. See additional terms and conditions
How to Create a Custom Gmail Address Using an Existing Domain Name
You already have a website for your business. Or at least a registered domain name. Now you want to set up a Gmail account to send business email. And use your domain name as your professional email address.
Google Workspace makes this very easy. Choose ‘Set up using your existing domain’ on this screen:
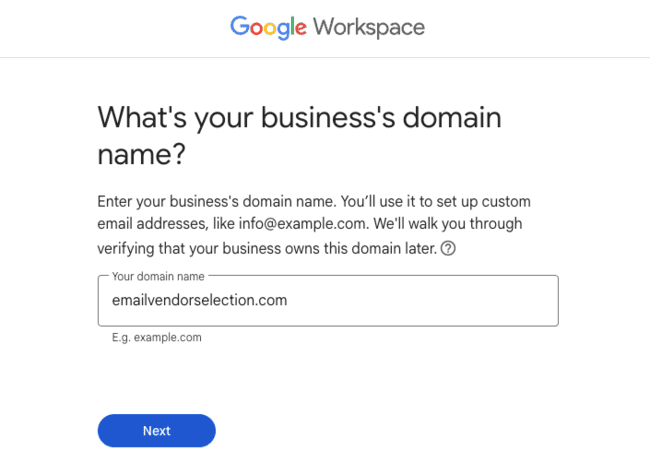
Once you enter the domain you want to use, Google will prompt you to confirm. This is because you’ll be creating a new Gmail account using that domain. Which will affect any existing business email account using that domain, if you have one. But there won’t be any changes until your Gmail account is activated.
Next, you will be prompted to create sign-in details for your new Workspace account. Then it’s a case of setting up your new Gmail account. Google walks you through this and confirms that you own the domain by asking you to add or update the necessary DNS records.
How To Create a Gmail Account Using an Existing Custom Email Address
If you have an existing domain for your business, you probably already have a business email, too. Few businesses with a functioning website won’t have email. The exception would be if you are just starting. Perhaps you have bought a domain before you launch your website and email. In that case, you would set up your Gmail address ‘from scratch’ as described above.
But what about using an existing, functioning email address? Perhaps one with lots of different inboxes on the same account? How do you switch that over to Gmail?
The initial setup process is just the same as using any custom domain. You create a new Google Workspace account. Choose ‘Set up using your existing domain’, then set up your Gmail account and verify your domain.
The difference is linking your existing email account to your new Gmail account. In short, you want the 2 to sync so you don’t miss any emails and can send properly.
There are 2 sides to this. First, you need to set up your new Gmail account so it can receive and send emails in sync with your existing account. Then you need to update the DNS records in your web host so it recognises your new Gmail account.
Here’s what you need to do in your Gmail account.
How to Receive Emails in Gmail
- In your Gmail inbox, click on the settings ‘Gear’ icon at the top left of the page. Then click ‘See all settings’.
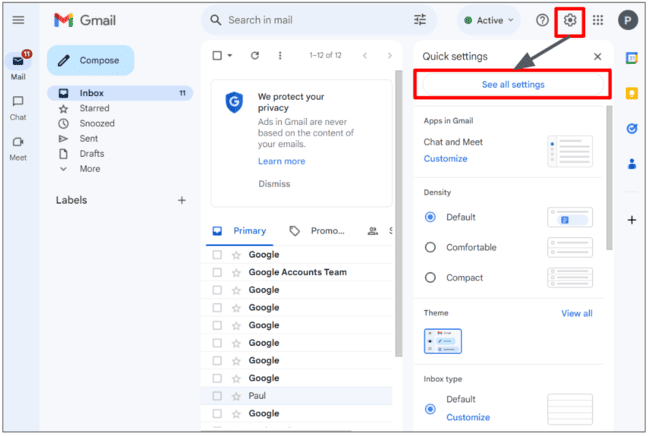
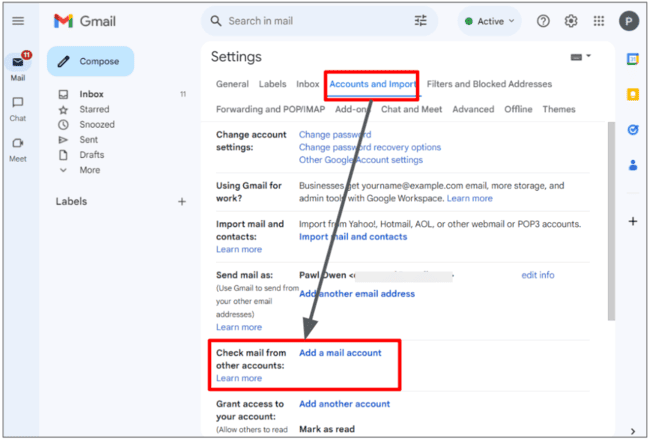
- Select the ‘Accounts and Import’ tab. From the drop-down menu, click on ‘Add a mail account’ in the ‘Check mail from other accounts’ section.
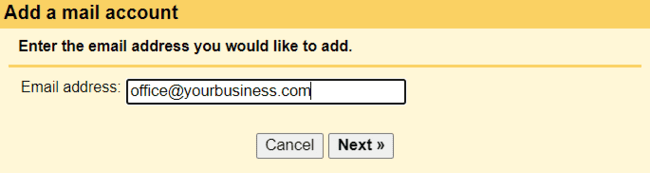
- Type your business email address into the pop-up box and click ‘Next’.
- Configure your account settings
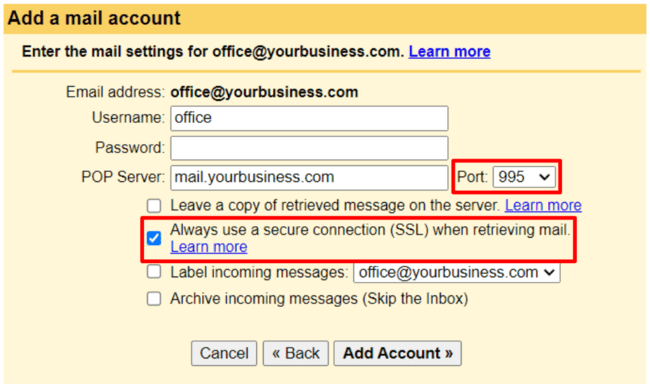
Input the username and password of your existing email account. You may need to use the full email address as the username.
To connect the 2 accounts, you will need to have POP enabled on your existing account. How to do this will vary depending on which email service provider you are using. Look it up on their online help pages. Make sure you enable POP for all email.
Two other things you should do are set the POP Server port to 995. And check the secure connection SSL option. These are important for security reasons. Using port 995 means the connection between Gmail and the mail server is encrypted. Port 995 and SSL both encrypt the connection between the email client and the mail server. This keeps your login details safe. And makes sure mail can’t be intercepted and read by other people.
How to Send Emails in Gmail
Setting up Gmail to send from an existing account carries straight on from the above:
- Confirm you also want to send email from this new Gmail account.
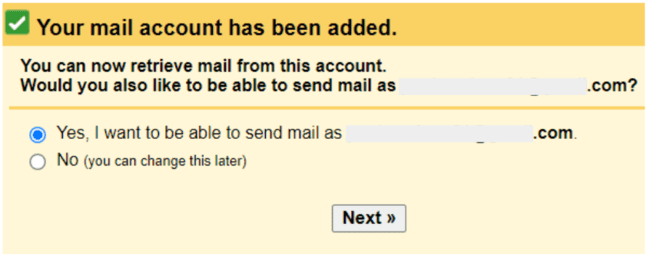
Google does this as some people want to run 2 email accounts side by side. And perhaps only send from one of them. But if you are transferring a business account into Gmail, you probably want to replace your old account. If so, leave the button checked ‘Yes’.
- Add email details for sending.
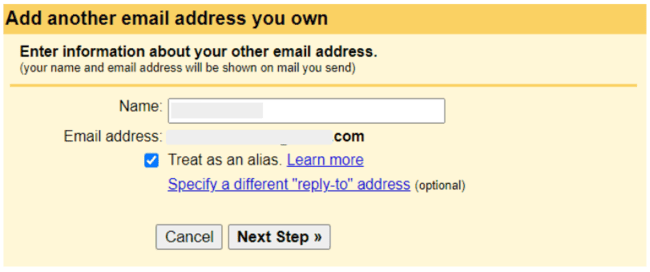
The main purpose of this step is to confirm the sender name that appears on your emails. Leave the ‘Treat this as an alias’ box checked if you are replacing an existing email account with Gmail. The only reason to uncheck it would be if you still want to run multiple accounts.
It’s unlikely that you will need to specify a different ‘reply-to’ address. One reason might be if you are sending from a generic email address. Like an ‘office@’ address or similar. You might want to give people a named email address to reply to. Just to make it more personal.
- Verify that you own the existing email address.
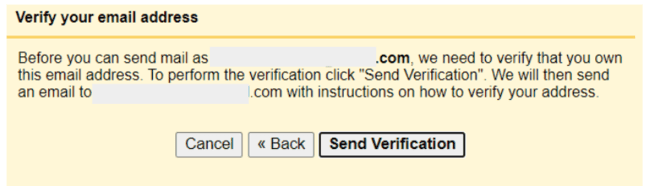
Google sends an email to your existing account for verifying domain ownership.
How to Set Up a Custom Gmail Address with Your Web Host
If you have a web host that also includes email hosting, you can create an email address with your hosting service. And then configure it in Gmail as described above. This setup lets you send and receive messages from a custom address (like yourname@yourdomain.com) using Gmail.
Step 1: Create your email account on your web host
Log in to your hosting control panel and find the menu to manage email accounts. It will be “Email,” “Email Accounts,” or similar.
Start adding a new email address. Choose the domain you want to use, enter the username before the @ sign, and set a strong password.
After creating the account, look for a “Manual Settings,” “Connect Devices,” or “Mail Client”. Here you’ll find the POP (incoming) and SMTP (outgoing) server addresses and port numbers. You’ll need these set up sending and receiving in Gmail.
Step 2: Configure Gmail to fetch emails using POP
Open your Gmail inbox and click the Gear icon, then choose See all settings. Navigate to Accounts and, under Check email from other accounts, click Add an email account. Enter the full custom email address, then select Import emails from my other account (POP3). In the next step, fill in:
- Username: usually the full custom email address.
- Password: the password you just created for this mailbox.
- POP server and port: use the values provided in your host’s manual settings.
- Leave a copy of retrieved messages on the server: check this if you want to keep messages on your host as well.
- Always use a secure connection (SSL): this encrypts the connection.
Click Add Account. Gmail will connect to your host and start pulling in messages.
POP fetching works, but it can be a little delayed because Gmail syncs emails on a schedule. If your web host supports email forwarding, you can forward incoming messages to your Gmail inbox for faster delivery. Keep your POP setup in place so you can still send and verify through your custom address when needed.
Step 3: Turn sending on through your domain’s SMTP server
To send from your custom address, return to Gmail’s Accounts section. Under Send mail as, click Add another email address. Enter your name and custom email address, and check Treat as an alias. This tells Gmail that both addresses belong to you. On the next screen, choose Send through “yourdomain” SMTP server and enter:
- SMTP server and port from your host’s manual settings.
- Username: usually the full custom email address.
- Password: the password you set for the mailbox.
- Secure connection: select the SSL or TLS option recommended by Gmail.
After you click Add Account, Gmail sends a verification email to your custom inbox. Open the verification message (it will arrive in Gmail if POP fetching is already set up) and follow the instructions to confirm. Once verified, you can choose your custom address in the From field when composing messages. And Gmail will send through your domain’s SMTP server.
Conclusion: How to Make Your Own Email in Gmail
A custom email account that includes your business’s name looks professional. Don’t be tempted to stick with a free Gmail account. Google Workspace is affordable and comes with dozens of features on top of email.
How to make your own email address in your Google account will depend on whether you already use a business email account or not. If you are just getting started, you can buy a custom domain through Google. Or you can use a domain you already own.
If you already have a business email account, you can import it into Gmail. This gives you the benefits of Gmail functionality. If you want to link a custom Gmail address to your web hosting account, you can do this too. Just make sure you use a web host that offers email hosting.
Finally, once you have your custom Gmail account set up, you don’t have to stick to only using Gmail. You can use the account to sign up for bulk email services, CRMs, and free SMTP servers. These are better for bulk and automated sending than Gmail. And with email template builders, you can design high-quality HTML emails. Without needing to code. But all your emails can still be sent with your custom Gmail address.
Frequently Asked Questions About Making Your Own Email with Gmail + Any Domain Name
How can I get a custom email address for free?
You do, however, need a domain. You can register a new custom domain name through Google Workspace. But you have to pay extra for the domain. Some website hosting services include a free domain name and email hosting as part of the package. You can set up a custom email address with your host. And then transfer the account into Gmail.
Why do I need a personalized email address?
Using a customized business email address helps to reassure people. If they recognize the business name in the email, they are more likely to trust it. You’ll get more opens and fewer people flagging your emails as spam.
How much is a custom email address?
Web hosting services often include domains and email hosting as part of the package. So you can set up a custom email for no extra cost.
Is Google Workspace Worth Paying For?
- Google Drive for file storage and sharing
- Google Meet for video calls and conferencing
- Calendar for scheduling and organisation
- Google Docs, Sheets and Slides, cloud-based word-processor, spreadsheet and presentation apps
- Sites for website building.
Is Gmail for Business free?
How can I make an email address for a custom domain?
What are the drawbacks of using POP3 or IMAP email?
POP3 is an older protocol and doesn’t synchronize across different devices. If you open an email on one device, it will still appear as unread on others. Sent emails are only saved on the device used to send them. Getting around this requires extra configuration. Devices also need to be configured to check for new mail. Or they don’t appear in the inbox.
IMAP stores messages in a remote server. This means a single email account will work smoothly across different devices. But this makes IMAP slower to get emails into an inbox.